Sunday, April 20, 2008

Cheese Soufflé


This recipe for cheese soufflé calls for a two-quart baking dish. I used to have one but lost track of it during my move from Richmond to DC. It’s probably somewhere in the storage unit amid Dave’s 80-thousand record albums. Maybe it will turn up.

In the meantime, I make do with two one-quart baking pans and bake two soufflés, an improvisation that’s now become a kitchen habit. We eat one soufflé the first night, then have the second a day or two later cold with a salad. While that sounds odd, cold cheese soufflé is actually quite good—sort of like an airy quiche.

Adapted from The Williamsburg Cookbook (1971), this recipe serves six and is ideal for a spring dinner party.

Ingredients:

½ cup butter

½ cup flour

2 cups whole milk

½ teaspoon salt

dash of cayenne

2 cups sharp cheddar cheese, grated

6 eggs, separated

1 ½ teaspoons dry mustard

Process:

Melt the butter over medium heat in a large saucepan. Gradually add the flour, stirring constantly to make a roux. While still stirring, slowly add the milk to make a smooth cream sauce. Turn up the heat slightly and continue to stir until slightly thickened. Remove from heat.

Stir in the grated cheese bit by bit. The heat of the sauce will melt the cheese into the mix. Set aside and let cool to almost-but-not-quite room temperature.

Separate the eggs. Beat the yokes together with the dry mustard and add to the cheese sauce. Be sure to stir thoroughly so that the warm sauce does not cook the egg yolks.

Beat the egg whites in a separate, large bowl until they form stiff peaks. Gently fold the egg whites into the cheese sauce.

Butter a two-quart baking dish and spoon in the cheese batter. For an added “chef’s touch,” try this technique to bake a “high hat” soufflé. Insert the head of a spatula upright into the batter about one inch away from the rim of the baking pan. Run the spatula around the inside parameter of the dish. The center cut section of the batter should rise up as the soufflé bakes.

Place in a preheated 375 degree oven for fifteen minutes. Then reduce the heat to 300 and bake for another 40 to 50 minutes. Serve immediately.

Sunday, April 6, 2008

Roasted Asparagus


Next time you go to market, you’ll see a bunch of people dancing a little jig in the produce department. Why? The season-ripe asparagus has arrived! Known as “Knitting Needle Asparagus” at our house, these long, slender veggies are divine steamed with just a dash of salt or roasted with a drizzle of olive oil. Because their season is short, we tend to have them a little too often for dinner, or so Dave complains. But that’s like complaining that you have too many strawberries (which will we will in a few short weeks!).

Here’s a quick recipe for roasted asparagus, a great side for grilled salmon or steak.

Ingredients:

½ tablespoon extra virgin olive oil

1 pound of knitting needle asparagus

salt and fresh ground pepper to taste

Process:

Wash the asparagus and trim the ends two to three inches. Put the vegetables cut end down in to a large glass water until you are ready to cook them. Asparagus are cousins of the amaryllis and should be treated like cut flowers!

When you are ready to prepare the vegetables, remove them from the water and pat them dry. Toss in a shallow Pyrex dish with olive oil, then dust with salt and pepper. Turn the asparagus onto a foil lined cookie sheet and spread them out into a single layer. Place in an oven preheated to 425 and roast for fifteen minutes. Check occasionally and stir them around a bit with a spatula so they’ll cook evenly.

Serve immediately with another twist of pepper.

Sunday, February 10, 2008

Valentine Cupcakes


Valentine Cupcakes

I bake these cupcakes for my husband on Valentine’s Day. But yellow batter cupcakes with chocolate frosting can be a treat anytime of the year. The cupcakes are actually an interpretation of my Grandmother Green’s 1-2-3-4 Cake, so called for the main ingredients and their amounts—one cup of butter, two cups of sugar, three cups of flour and four eggs. The result is a dense cake that’s a perfect foil for the bittersweet chocolate frosting. That recipe comes from my Mom’s battered paperback edition of The Women’s Day Cookbook, circa 1964. Recipes that have a family history are always the best!

1-2-3-4 Cupcakes

Ingredients:

1 cup butter

2 cups sugar

4 eggs

1 cup milk

3 cups flour

3 teaspoons baking powder

1/2 teaspoon salt

1 teaspoon vanilla

Process:

Cream together the butter and sugar in a large ceramic bowl. Next slip in the eggs one at a time, beating thoroughly after each. (Evidently this step will help the cake to rise.) Shift together the flour, baking powder and salt. Add to the butter and sugar mixture a cup at a time alternatively with the milk. Stir in the vanilla last.

Line a 12 cup muffin tin with cupcake papers. Fill each three-quarters full, then bake in a preheated 350-degree oven. After 20 minutes or so, test for “doneness” by slipping a sharp knife into a cupcake center; if the knife comes out clean, the cupcake is fully baked. Let them sit for 10 minutes to cool, then flip them out of the tin and bake another batch. Cool the cupcakes completely before icing them.

This recipe makes about 24 cupcakes.

Semisweet Chocolate Frosting

Ingredients:

1 12 oz package of semisweet chocolate morsels

3 tablespoons butter

½ cup confectioners sugar

½ cup evaporated milk

1 teaspoon vanilla

¼ teaspoon salt.

Process:

Melt the semisweet morsels and butter together in the top part of a double boiler. Remove from the heat. Beat in the confectioners sugar in small amounts alternatively with the evaporated milk. Next add the vanilla and salt and beat again until smooth. This recipe can generously frost 24 cupcakes or three 8-inch cake layers.

Decorate the cupcakes with some Conversation Hearts—or Hershey Kisses—or whatever holiday candy strikes your fancy!

Wednesday, January 23, 2008

Japanese Spinach


Though served cold, I think of Japanese Spinach as a savory winter dish. The piquant flavor of the steamed greens is balanced by the sweetness of gomaiso, a Japanese condiment made with toasted sesame seeds. (You can find gomaiso in the Asian foods section of most large grocery stores.) Quick to make, Japanese Spinach is an ideal dinner side on “school nights.”

Adapted from Japanese Women Don’t Get Old or Fat (2006)

Ingredients:

1 package pre-washed spinach (9 oz.)

2 ½ tablespoons of gomaiso

1 ½ teaspoons sugar

dash salt

1 12/ teaspoons tamari

Process:

Steam the spinach for just a minute until bright green. Remove from heat immediately and dump onto a large dinner plate. Using a fork or a pair of chopsticks, spread the spinach leaves around the plate to cool. Blot up excess water with paper towels.

In a small bowl, combine the gomaiso, sugar and salt. Gradually add the tamari; the mix should look like wet, course sand. Sprinkle the sesame seeds on the spinach, then transfer to a large bowl to stir more thoroughly. Divide the spinach into four modest portions. Serve with broiled salmon, rice, steamed carrots and green tea for a Japanese inspired dinner.

Sunday, January 13, 2008

Panetonne French Toast


You can maintain those resolutions to eat more healthfully and save money by making a batch of Panetonne French Toast. This recipe upholds the idea that an occasional treat is necessary in a wholesome approach to cooking and eating. And the fact that you are using leftovers is thrifty—right? ( I purchased a large panetonne on sale at Whole Foods the week after Christmas, an added savings!)

Why not share these sterling virtues with your friends at brunch next Sunday? Serve the French Toast with orange slices, then fix some bacon and eggs as a side. Coffee, juice and (why not?) the bottle of champagne you didn’t open at New Year’s rounds off the menu.


Ingredients:

For the French Toast--

1 panetonne (16 oz.) (If you can’t find a discount panetonne, try raisin bread or a large brioche)

4 eggs

1 cup whole milk

½ teaspoon vanilla

1 teaspoon of sugar (this will help brown the toast)

butter

For the Garnishes—

3 to 4 oranges

maple syrup

pecans

raisins

Process:

Using a serrated bread knife, cut the panetonne into slices about three-quarters of an inch thick. Beat together the eggs, milk, vanilla and sugar in a wide bowl. Soak a single piece of the panetonne in the egg-and-milk for at least a minute. Melt a small pat of butter over medium heat in a large pan. Slip in the panetonne and fry until golden brown, say for a minute or so. Turn and cook for a minute more. In the meantime, soak another slice to have at the ready when the first has finished. To keep the toast warm, place in a pie pan, cover with foil and put in a 250 degree oven.

Peel and slice the oranges. Toss in a bowl with a handful of raisins and nuts to make ambrosia. Serve with optional maple syrup as a garnish for the French Toast.

Serves four.


Sunday, January 6, 2008

Beef Sort Of Bourguignon


With great expectations, my Dad presented my Mom with a copy of Julia Childs’ Mastering the Art of French Cooking. Her first attempt was Boeuf Bourguignon, a complex dish that involved threading a piece of beef with lardons and simmering little pearl onions. Though it was tasty, Mom couldn’t afford the time (or the money) on such recipes. So she simplified the dish, then simplified her simplification until she had something she could easily prep on Monday and use for meals the rest of the week.

My brother T.H. and I both loved this growing up—and now we each regularly cook Beef Sort of Bourguignon for our families!

Ingredients:

1 chuck roast, weighing 2.5 to 3 pounds

Dash of meat tenderizer

2 tablespoons olive oil

salt, pepper and dried thyme

1 15 oz. can of beef bouillon

1 15 oz can of whole tomatoes

½ onion, cut into thick slices

3 cloves of garlic

2 bay leaves

½ pound of mushrooms

Process:

Tenderize the meat according to instructions on the product label. Heat the olive oil in a large stove top pot with a lid and brown the meat on both sides. Season liberally with salt, pepper and thyme.

When the meat has browned, turn the heat down and add the bouillon and half of the juice from the can of tomatoes. Cut the tomatoes into rough pieces and cover the surface of the roast with them and the onion. Add the garlic and bay leaves. Cover with the pot lid and let the meat gently simmer for an hour.

Wash and slice the mushrooms into thick pieces. Add to the roast and cook for another hour so the rich flavor of the broth will seep into the mushrooms.

After the meat has cooked for a total of two hours, remove from the stove and cool. When it has reached room temperature (or close enough to it), put the dish in the refrigerator to chill (overnight is best). Skim the excess fat and discard.

Remove the beef from the broth and slice into pieces about ¼-inch thick. The beef can be served hot or cold. To re-heat, return the skimmed pot to the stove and slowly warm over a low flame. Arrange slices on a large plate with the mushrooms, tomatoes and onions. Spoon some of the broth on top.

Theme and Variations:


Typically we have this the first night with small potatoes and steamed leafy greens.

• Later in the week, add some egg noodles to the beef and broth. Serve with a plain green salad.

•Cold beef slices make hearty sandwiches with sourdough rolls and condiments like stone ground mustard or horseradish sauce.

•Any remaining leftovers can be turned into an absolutely evil beef pot pie. Just add about a cup of cooked "mixed veggies" to the mushroom-and-meat stock. Top with a making of biscuit dough and bake until golden. Serve with steamed green beans.

Sunday, December 30, 2007

Cheese Wafers


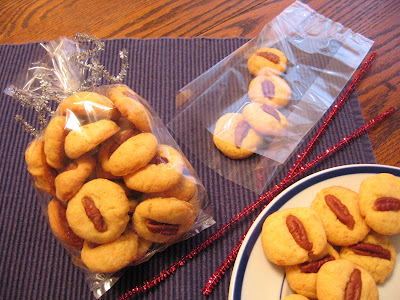
All Southern women, even those who don’t cook, have a recipe for cheese wafers. (They also all have a recipe for lemon ice box pie made with condensed milk, but that’s another post for another time). Cheese wafers are a great “little something” to have with a drink. And during the holidays they make a welcome hostess gift in contrast to all of the cookies and candy on offer.

My Mother’s recipe makes a wonderfully “sandy” wafer with a texture akin to shortbread. The secret is to use the finest holes on the grater to prep the cheese—a tedious task, but well worth the effort.

Ingredients:

1 cup butter

½ pound of sharp cheddar cheese, finely grated

2 cups flour

1 teaspoon salt

scant dash of red pepper

pecan slivers (optional)

Process:

Set butter out in a ceramic bowl to soften. Stir in the grated cheese, preferably using an electric hand mixer to make sure that the ingredients are thoroughly combined. Mix together the flour and spices and gradually add to the cheese mixture. The dough will be quite stiff.

Cover a cookie sheet with aluminum foil. Pinch off a small amount of dough and roll into a ball about an inch round. Place on cookie sheet two inches apart. Press each gently with a finger, then top with a pecan sliver. Bake in a 425 over for about 10 minutes or until dry and slightly golden. Watch them carefully! Cheese wafers burn easily.

Remove from oven and quickly transfer to a large plate to cool. Store the wafers in a metal tin where they should keep for about a week.

Theme and Variations:

To make a gift bag of cheese wafers, let them cool completely. Purchase some cellophane bags and glittery pipe cleaners at a craft shop like Ben Franklin or Michael’s. A 12-inch bag holds about two dozen wafers. Close with a festive twist tie and take to a party.