Sunday, December 30, 2007

Cheese Wafers


All Southern women, even those who don’t cook, have a recipe for cheese wafers. (They also all have a recipe for lemon ice box pie made with condensed milk, but that’s another post for another time). Cheese wafers are a great “little something” to have with a drink. And during the holidays they make a welcome hostess gift in contrast to all of the cookies and candy on offer.

My Mother’s recipe makes a wonderfully “sandy” wafer with a texture akin to shortbread. The secret is to use the finest holes on the grater to prep the cheese—a tedious task, but well worth the effort.

Ingredients:

1 cup butter

½ pound of sharp cheddar cheese, finely grated

2 cups flour

1 teaspoon salt

scant dash of red pepper

pecan slivers (optional)

Process:

Set butter out in a ceramic bowl to soften. Stir in the grated cheese, preferably using an electric hand mixer to make sure that the ingredients are thoroughly combined. Mix together the flour and spices and gradually add to the cheese mixture. The dough will be quite stiff.

Cover a cookie sheet with aluminum foil. Pinch off a small amount of dough and roll into a ball about an inch round. Place on cookie sheet two inches apart. Press each gently with a finger, then top with a pecan sliver. Bake in a 425 over for about 10 minutes or until dry and slightly golden. Watch them carefully! Cheese wafers burn easily.

Remove from oven and quickly transfer to a large plate to cool. Store the wafers in a metal tin where they should keep for about a week.

Theme and Variations:

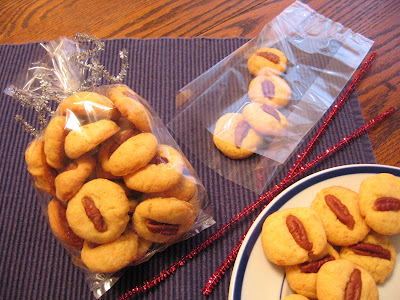
To make a gift bag of cheese wafers, let them cool completely. Purchase some cellophane bags and glittery pipe cleaners at a craft shop like Ben Franklin or Michael’s. A 12-inch bag holds about two dozen wafers. Close with a festive twist tie and take to a party.

Wednesday, December 26, 2007

Low Key Holiday Party


A family friend and new mom invited a small group to her place for a wonderfully low-key holiday party. She offered pie and coffee with tea lights and classical music in the background. It was great to sit and talk and take a break from the “too muchness” of the season.

Raise a pie pan and toast your friends this New Year: champagne is a treat—but warm apple pie with vanilla ice cream is even better!

Recipe adapted from The Williamsburg Cookbook (1971)

Ingredients:

Two 9-inch whole wheat frozen pie crusts (I like the Wholly Wholesome brand)

5 to 6 Granny Smith apples

1 cup of sugar

2 tablespoons flour

1/8 teaspoon salt

¾ teaspoon cinnamon

½ teaspoon nutmeg

2 tablespoons of cold butter, cut into small pieces

½ teaspoon lemon juice

Process:

Thaw the pie crusts on a kitchen counter while you work.

Peel and core the Granny Smith apples. Cut them into slices approximately ¼-inch thick and place in a large ceramic bowl. In a smaller bowl, mix together the sugar, flour and spices. Toss into the apples and stir to coat them evenly. Prick the bottom of one of the pie crusts with a fork. Spoon the apple mixture into the crust, creating a high mound in the center. Dot the pie with butter and sprinkle with lemon juice. Invert the remaining pie crust over the first like a cap and gently pull off the aluminum pie plate. Crimp the top and bottom crusts with your fingers. With a sharp knife or cookie cutter, cut a pretty shape on the pie top. Next cover the pie loosely with aluminum foil

Place the pie on a cookie sheet lined with more foil to catch drips. Bake at 425 for 25 to 30 minutes, then remove the foil cover and bake for 20 minutes more or until the top is brown and the apples have softened.

Remove and let sit for 15 minutes. Serve warm with vanilla ice cream or whipped cream flavored with a dash of vanilla and sugar.

Theme and Variations:

• If you live in the Silver Spring area, try this pie with ginger or cinnamon ice cream from York Castle Ice Cream on Georgia Avenue.

• This recipe calls for Granny Smith apples which are sharp and tart; if you prefer a sweeter apple, try Courtland or Gala apples and reduce the sugar by ½ cup.

Friday, December 7, 2007

Baked Manicotti Shells


One of the many details I loved in The Sopranos was how American-born-but-Italian-bred characters would refer to their favorite foods by shortened names: manicotti was manicot; procuitto, proshute. These diminutives made what are to most of us lavish restaurant dishes into something served at home.

In keeping with that sensibility, here’s a recipe for manicot that’s both rich and simple, ideal for family celebrations during the holiday season. An added plus is that manicot can be baked ahead of time, then easily transported to your vegetarian cousin’s house.

Adapted from Leone's Italian Cookbook (1967)

Ingredients:

Pasta:

Two large boxes of pasta shells (I use Barilla Jumbo Shells)

Sauce:

Prepare a double recipe of Veggie Spaghetti Sauce found on the Kitchen Tango post dated
March 12, 2007. Let sauce cool and set aside.

Filling:

¾ cup ricotta cheese

¾ cup mozzarella, diced

2 tablespoons butter, cubed

3 eggs, slightly beaten

2 tablespoons grated parmesan cheese (plus extra for garnish)

½ teaspoon salt

dash course-ground pepper

Process:

In a medium-size ceramic bowl, combine the ricotta, mozzarella and butter. Beat the eggs separately, then gently toss into the cheese-butter mix. Sprinkle with spices and the parmesan cheese, stir again and set aside.

Prep the large pasta shells according to the directions on the box. When shells are al dente, drain and put in a large buttered dish where they’ll keep reasonably moist while you work with them.

Butter an 8” x 12” Pyrex dish and spread it with about a two cups of tomato sauce. Gingerly pick up each shell and fill with two spoonfulls of the cheese mix. Eyeball what seems right; the shell should be plump, but not bursting. Line the filled shells about a quarter inch apart in the baking dish. I’ve gotten in as many as thirty manicotti into a long casserole. If there’s more, grab another dish, coat with tomato sauce, and fill with stuffed shells. (Hey, there’s no such thing as too much manicotti. If you don’t want it, a neighbor, friend or nearby working parent will).

Top each shell with a large spoonful of veggie sauce and sprinkle with more grated parmesan. Bake for 10 to 15 minutes in preheated 350-degree oven. Remove and serve at once with steamed green beans, garlic bread and Chianti. For dessert, have something simple like tangerines with biscotti or macaroons and a round of strong coffee.

Manicotti To Go:

If you plan to transport your manicotti to another holiday venue, follow these directions:

Let the casserole cool to room temperature. Cover tightly with foil and refrigerate up to a day.

To reheat, keep covered and place in a 250-oven and bake for 15 to 20 minutes.

Cheese Note: Skim or Regular?

I’m all for cutting calories as along as flavor doesn’t suffer! I’ve prepared this dish with skim ricotta and can’t taste the difference. But there is a significant difference, I think, between skim and regular mozzarella. The first tastes pale and wimpy; the later, rich and mellow. If manicot is a dish you prepare for special occasions, why fret over fat content? Go for the real thing and add a mile to your walk the next day.

As for the parmesan, it is far tastier and worth the money to buy a hunk of the authentic stuff and grate it yourself. If you don’t use it all up for the manicot, be lavish with the parmesan on your pasta the following week. While ladies age gracefully, cheese does not.